> ## Documentation Index
> Fetch the complete documentation index at: https://docs.boltz.bio/llms.txt
> Use this file to discover all available pages before exploring further.
# Design Tab
> The Design Tab allows de-novo edits of molecules within the UI.
Molecules in the Design tab are cached and persist for the current Experiment/Virtual Screen, so you can build up a collection of designs across multiple sessions.
The Design tab currently supports manual molecule input using the built-in Ketcher drawing tool. Additional capabilities will be deployed in future releases.
### Adding Molecules to Design Tab
There are three ways to add molecules from your virtual screen results to the Design workspace:
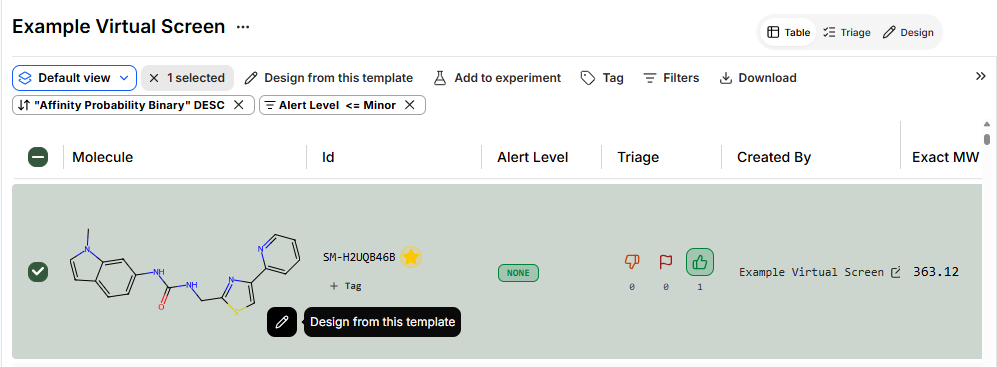 **Method 1: Hover over molecule**
* In the **Table** view, hover over any molecule structure
* A pen icon (✏️) appears with "Design from this template" tooltip
* Click to add the molecule to the Design tab
**Method 2: Select from table**
* Use the checkbox to select one or more molecules in the Table
* Click **Design from this template** in the top menu
* Choose to either:
* Add to existing designs already in the Design tab
* Replace existing molecules in the Design tab
**Method 3: Switch and go!**
* Switch to the Design tab and start drawing - it's that simple!
***
### Design Tab Interface
**Method 1: Hover over molecule**
* In the **Table** view, hover over any molecule structure
* A pen icon (✏️) appears with "Design from this template" tooltip
* Click to add the molecule to the Design tab
**Method 2: Select from table**
* Use the checkbox to select one or more molecules in the Table
* Click **Design from this template** in the top menu
* Choose to either:
* Add to existing designs already in the Design tab
* Replace existing molecules in the Design tab
**Method 3: Switch and go!**
* Switch to the Design tab and start drawing - it's that simple!
***
### Design Tab Interface
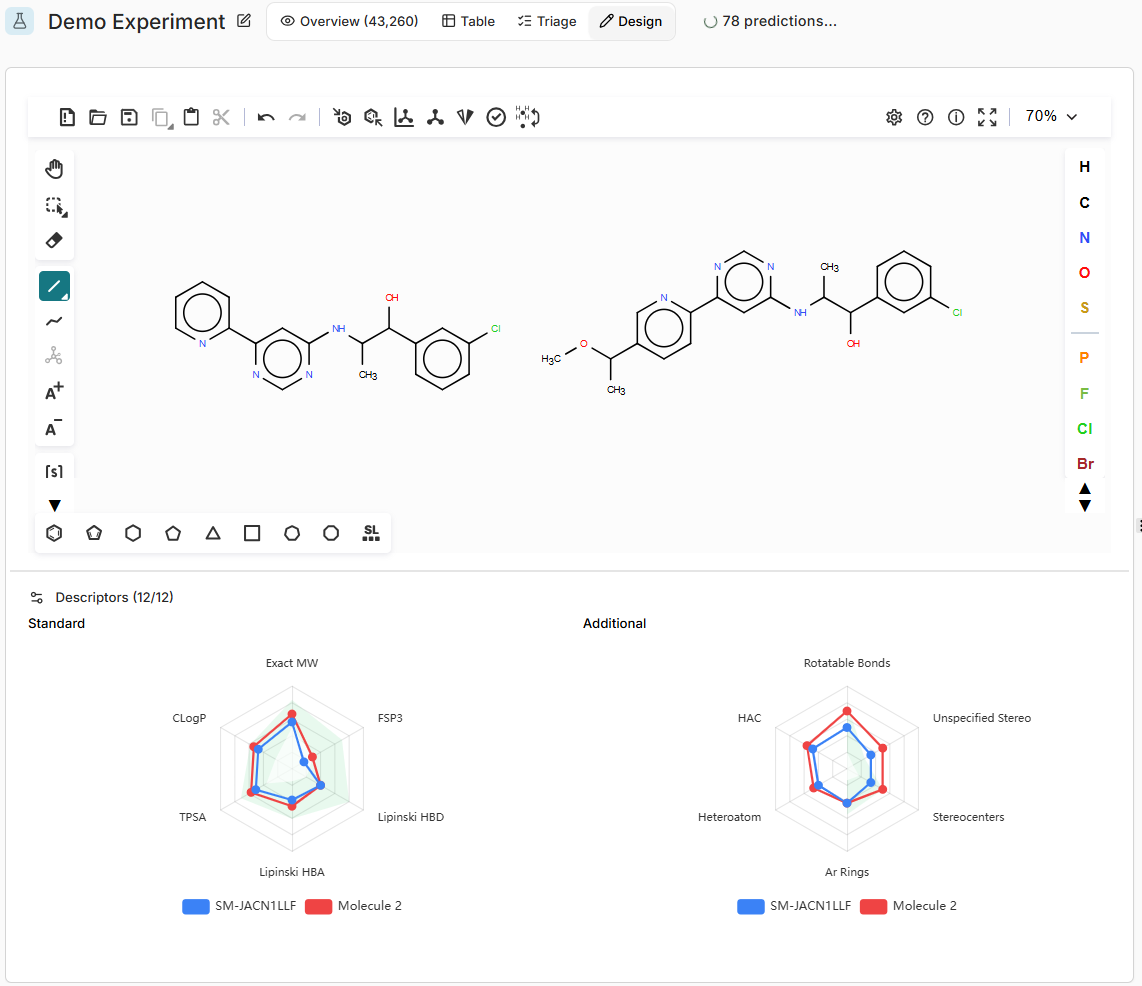 The Design workspace is divided into several sections:
Full-featured molecular drawing interface for creating and editing structures:
* Draw new molecules from scratch
* Edit molecules added from results
* Create copies and variants
* Standard drawing tools (bonds, atoms, rings, functional groups)
* Multiple molecules can be worked on simultaneously
Displays the Boltz prediction and pocket for selected molecules:
* Target selection dropdown (if multiple targets exist)
* Interactive 3D structure visualization - highlight sidechains and residues
* Rotatable and zoomable view
Two radar charts showing molecular properties for all molecules in the workspace. **These update live as you edit structures in the Ketcher editor.**
**Standard descriptors:**
* Exact MW (Molecular Weight)
* CLogP (Lipophilicity)
* TPSA (Topological Polar Surface Area)
* Lipinski HBD (Hydrogen Bond Donors)
* Lipinski HBA (Hydrogen Bond Acceptors)
* FSP3 (Fraction sp3 carbons)
**Additional descriptors:**
* Rotatable Bonds
* HAC (Heavy Atom Count)
* Heteroatom count
* Stereocenters
* Unspecified Stereo
* Ar Rings (Aromatic Rings)
Each molecule is color-coded for easy comparison.
Shows all molecules queued for submission:
* Thumbnail structures with IDs
* Multiple molecules can be submitted together
* Visual confirmation before submission
***
### Working with Molecules
Either add molecules from your results (using "Design from this template") or draw new molecules using the Ketcher editor.
Use the Ketcher drawing tools to modify structures - add substituents, change ring systems, modify functional groups.
The radar plots update live as you edit - watch how your modifications affect molecular properties in real-time. Each molecule's profile is overlaid for direct comparison.
Verify all molecules appear correctly in the Molecule Preview panel at the bottom right.
Click **Submit Molecule** to proceed to target selection and add these designs to your virtual screen.
***
### Submitting Designs
The Design workspace is divided into several sections:
Full-featured molecular drawing interface for creating and editing structures:
* Draw new molecules from scratch
* Edit molecules added from results
* Create copies and variants
* Standard drawing tools (bonds, atoms, rings, functional groups)
* Multiple molecules can be worked on simultaneously
Displays the Boltz prediction and pocket for selected molecules:
* Target selection dropdown (if multiple targets exist)
* Interactive 3D structure visualization - highlight sidechains and residues
* Rotatable and zoomable view
Two radar charts showing molecular properties for all molecules in the workspace. **These update live as you edit structures in the Ketcher editor.**
**Standard descriptors:**
* Exact MW (Molecular Weight)
* CLogP (Lipophilicity)
* TPSA (Topological Polar Surface Area)
* Lipinski HBD (Hydrogen Bond Donors)
* Lipinski HBA (Hydrogen Bond Acceptors)
* FSP3 (Fraction sp3 carbons)
**Additional descriptors:**
* Rotatable Bonds
* HAC (Heavy Atom Count)
* Heteroatom count
* Stereocenters
* Unspecified Stereo
* Ar Rings (Aromatic Rings)
Each molecule is color-coded for easy comparison.
Shows all molecules queued for submission:
* Thumbnail structures with IDs
* Multiple molecules can be submitted together
* Visual confirmation before submission
***
### Working with Molecules
Either add molecules from your results (using "Design from this template") or draw new molecules using the Ketcher editor.
Use the Ketcher drawing tools to modify structures - add substituents, change ring systems, modify functional groups.
The radar plots update live as you edit - watch how your modifications affect molecular properties in real-time. Each molecule's profile is overlaid for direct comparison.
Verify all molecules appear correctly in the Molecule Preview panel at the bottom right.
Click **Submit Molecule** to proceed to target selection and add these designs to your virtual screen.
***
### Submitting Designs
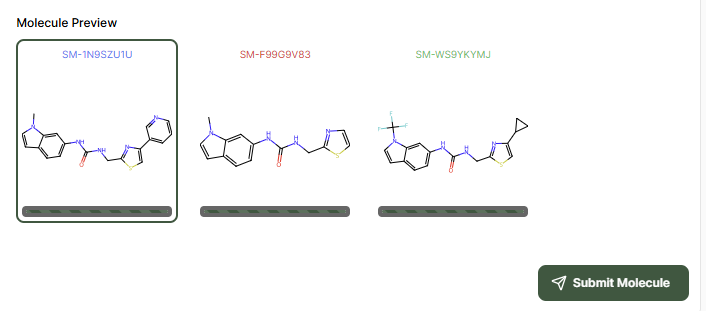 When you click **Submit Molecule**, you'll be prompted to choose which target(s) to predict structures and binding against. You can select multiple targets simultaneously if you want to evaluate your designs against several targets.
To **track progress** of designed molecules, a bar appears under each molecule in the Molecule Preview panel, showing prediction status in real-time
Once predictions complete, your manually designed molecules are added to the virtual screen results.
***
### Finding Your Designs in Results
After submission, locate your manually created designs in the results:
**Filter by creator:**
* In the Table view, use the **Created By** column
* Filter or sort to show molecules you submitted via the Design tab
**Filter by date:**
* Use date filters to show recently submitted designs
* Helpful for distinguishing manual designs from generative campaign outputs
The Tag function can also be used to mark your manually designed molecules immediately after submission to easily distinguish them from other results.
***
### Use Cases
Select a hit from your results, then use the Design tab to manually create analogs by modifying specific substituents or functional groups based on your medicinal chemistry expertise.
Draw a small set of closely related analogs (e.g., systematic R-group exploration) and submit them together for rapid SAR assessment.
Use the radar plots to guide modifications - adjust structures to shift CLogP, reduce MW, or improve other properties while monitoring changes in real-time.
Sketch specific molecules to test structural hypotheses that may not emerge from generative campaigns. Submit against multiple targets simultaneously to assess selectivity or cross-reactivity.
***
### Best Practices
Work with 2-3 molecules simultaneously to compare property profiles directly on the radar plots
Apply tags to manually designed molecules for easy tracking in the results table
Take advantage of live property updates - modify structures and immediately see how CLogP, MW, and other descriptors change
Review binding predictions of submitted designs, then create refined versions in new Design sessions
***
When you click **Submit Molecule**, you'll be prompted to choose which target(s) to predict structures and binding against. You can select multiple targets simultaneously if you want to evaluate your designs against several targets.
To **track progress** of designed molecules, a bar appears under each molecule in the Molecule Preview panel, showing prediction status in real-time
Once predictions complete, your manually designed molecules are added to the virtual screen results.
***
### Finding Your Designs in Results
After submission, locate your manually created designs in the results:
**Filter by creator:**
* In the Table view, use the **Created By** column
* Filter or sort to show molecules you submitted via the Design tab
**Filter by date:**
* Use date filters to show recently submitted designs
* Helpful for distinguishing manual designs from generative campaign outputs
The Tag function can also be used to mark your manually designed molecules immediately after submission to easily distinguish them from other results.
***
### Use Cases
Select a hit from your results, then use the Design tab to manually create analogs by modifying specific substituents or functional groups based on your medicinal chemistry expertise.
Draw a small set of closely related analogs (e.g., systematic R-group exploration) and submit them together for rapid SAR assessment.
Use the radar plots to guide modifications - adjust structures to shift CLogP, reduce MW, or improve other properties while monitoring changes in real-time.
Sketch specific molecules to test structural hypotheses that may not emerge from generative campaigns. Submit against multiple targets simultaneously to assess selectivity or cross-reactivity.
***
### Best Practices
Work with 2-3 molecules simultaneously to compare property profiles directly on the radar plots
Apply tags to manually designed molecules for easy tracking in the results table
Take advantage of live property updates - modify structures and immediately see how CLogP, MW, and other descriptors change
Review binding predictions of submitted designs, then create refined versions in new Design sessions
***