> ## Documentation Index
> Fetch the complete documentation index at: https://docs.boltz.bio/llms.txt
> Use this file to discover all available pages before exploring further.
# Setting Up Constraints
> Step-by-step instructions for configuring bond, contact, and pocket constraints.
After uploading your molecules in Sandbox or Design Projects, navigate to the **Constraints** step. Here you can add structural guidance to improve prediction accuracy for challenging binding modes.
Constraints are optional - skip this step if your system doesn't require them.
For well-characterized binding interactions at defined sites, the model will automatically identify the binding site.
***
## Bond Constraints
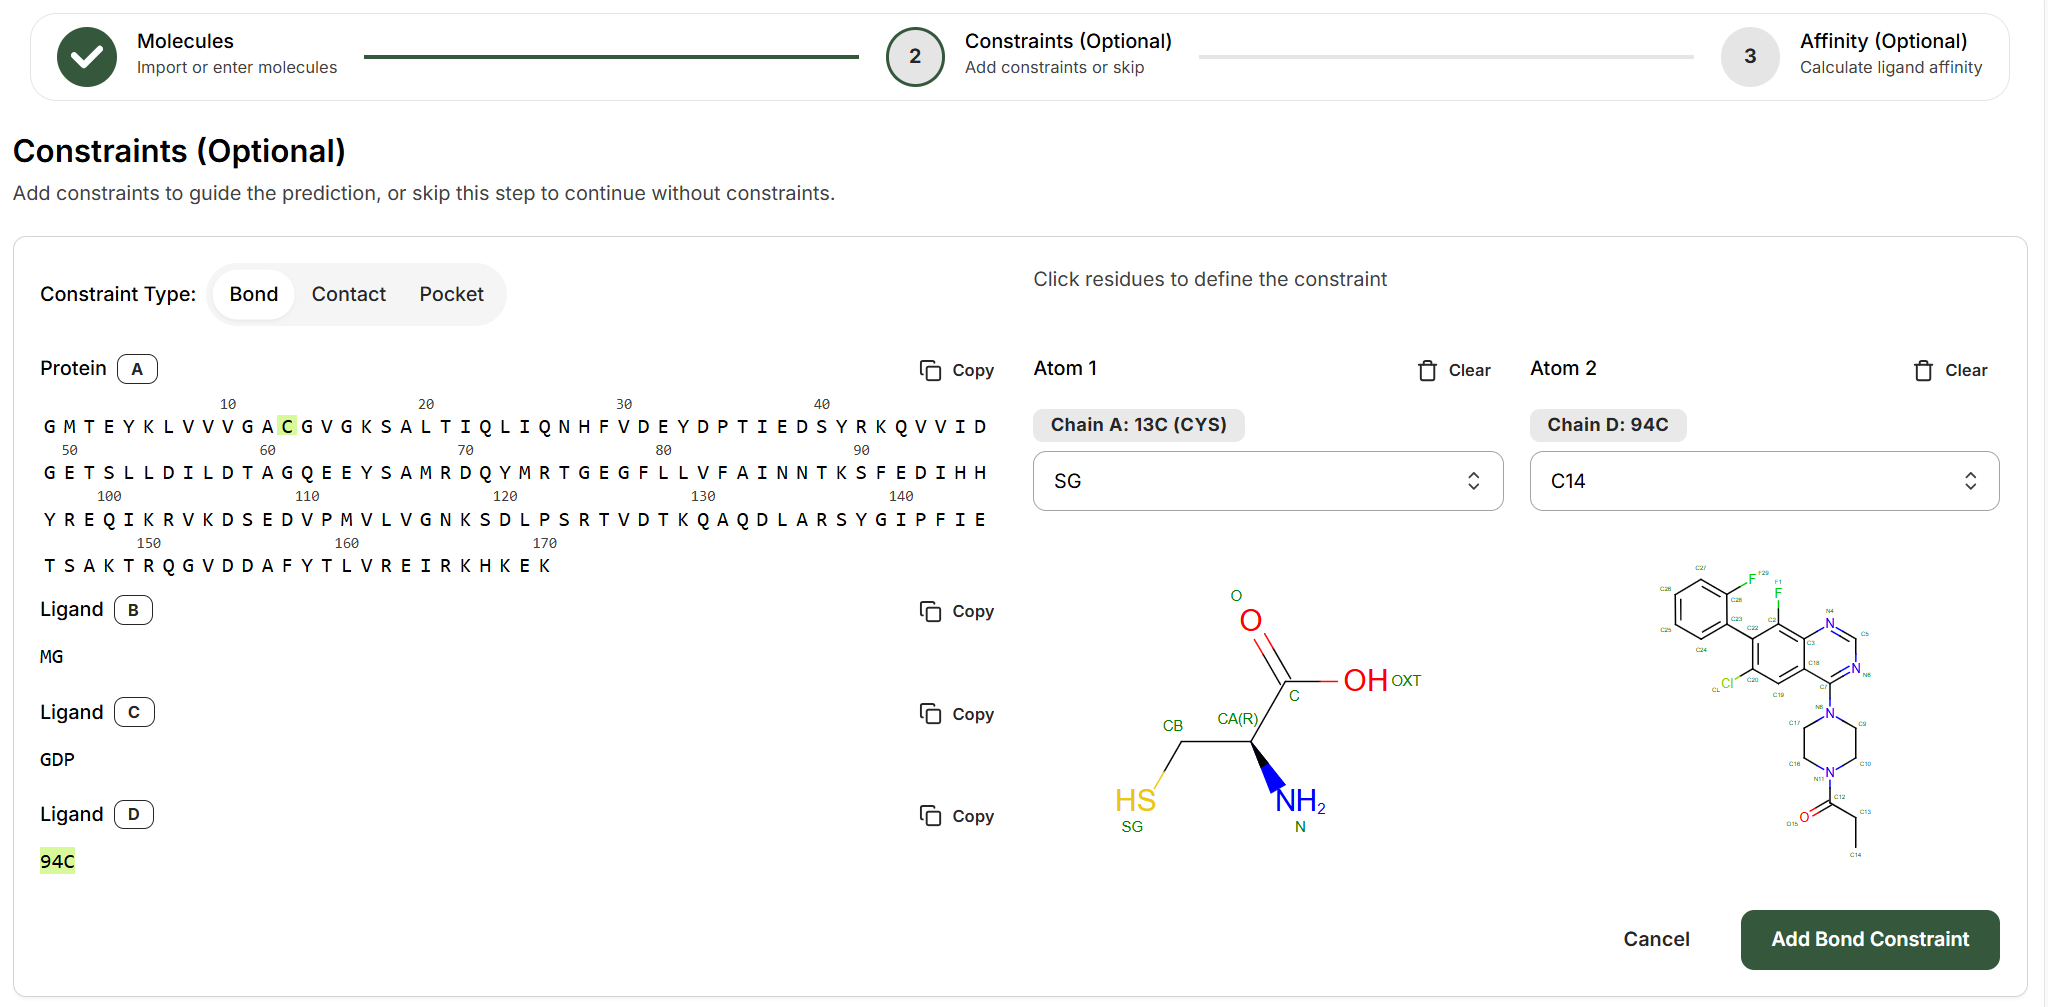
Bond constraints define covalent bonds between specific atoms that are essential for modeling covalent attachments such as irreversible inhibitors (e.g., EGFR covalent drugs), peptide cyclization, or disulfide bonds.
### How to Set Up a Bond Constraint
Choose any two entities that will form the bond (protein chains, ligands, DNA, RNA) from the left panel. For example:
* **Protein A** and **Ligand D** for a covalent inhibitor
* **Protein A** and **Protein A** for a disulfide bond between residues
* **Protein A** and **DNA B** for a covalent DNA-protein crosslink
On the right side, use the dropdown menus to specify which atoms will form the covalent bond:
**Atom 1 (Protein side):**
* **Chain:** The protein chain letter (e.g., Chain A)
* **Residue:** The residue number and identity (e.g., 13C CYS)
* **Atom:** Select from available atoms (e.g., SG for cysteine sulfur)
**Atom 2 (Ligand side):**
* **Chain:** The ligand chain letter (e.g., Chain D)
* **Residue:** Ligand identifier (e.g., 94C)
* **Atom:** Select the reactive atom (e.g., C14 for acrylamide carbon)
The platform displays 2D structures to help you identify the correct atoms.
Click **Add Bond Constraint** to save. You can add multiple bond constraints if your system has more than one covalent attachment.
 Bond constraints are **hard constraints**—the model must satisfy them. Only use bond constraints when you have strong evidence for a covalent interaction.
***
## Contact Constraints
Contact constraints define distance restraints between atoms or residues, ideal for known interaction sites.
### How to Set Up a Contact Constraint
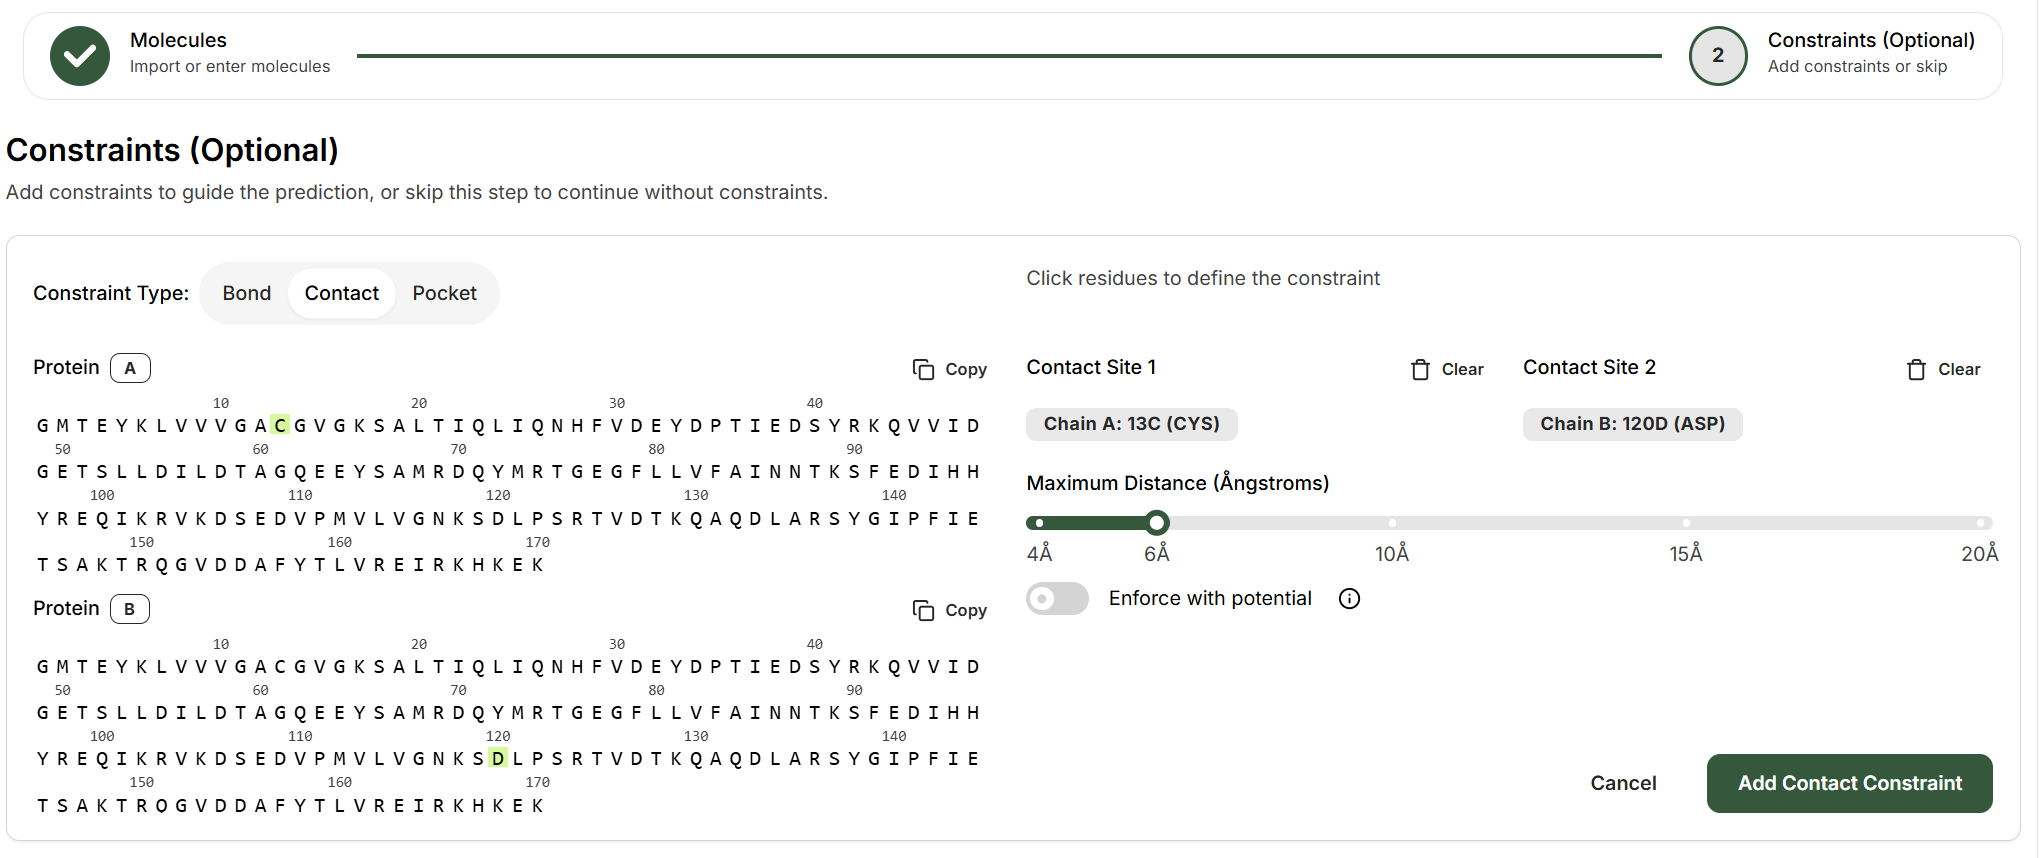
Choose any two entities that should be in proximity. Contacts can be between any pair of biomolecules (protein, ligand, DNA, RNA), for example:
* **Protein-protein:** Two different residues
* **Protein-ligand:** A protein residue and a ligand
Example: Chain A residue 13C (CYS) and Chain B residue 120D (ASP) for a molecular glue bridging two proteins.
Depending on the entities selected, you may need to specify which atoms participate in the contact. For small molecules (ligands), select the specific atom. For polymer residues (protein, DNA, RNA), the constraint applies to one atom in the residue.
Use the slider to define the maximum allowed distance between the contact sites, ranging from **4Å to 20Å**:
* **4-6Å:** Tight interaction (hydrogen bonds, salt bridges)
* **8-12Å:** General proximity (nearby residues)
* **15-20Å:** Loose guidance (same binding region)
Toggle **"Enforce with potential"** to make the distance constraint stronger. This leverages the Boltz-steering technique to enforce the distance constraint.
Click **Add Contact Constraint** to save.
Bond constraints are **hard constraints**—the model must satisfy them. Only use bond constraints when you have strong evidence for a covalent interaction.
***
## Contact Constraints
Contact constraints define distance restraints between atoms or residues, ideal for known interaction sites.
### How to Set Up a Contact Constraint
Choose any two entities that should be in proximity. Contacts can be between any pair of biomolecules (protein, ligand, DNA, RNA), for example:
* **Protein-protein:** Two different residues
* **Protein-ligand:** A protein residue and a ligand
Example: Chain A residue 13C (CYS) and Chain B residue 120D (ASP) for a molecular glue bridging two proteins.
Depending on the entities selected, you may need to specify which atoms participate in the contact. For small molecules (ligands), select the specific atom. For polymer residues (protein, DNA, RNA), the constraint applies to one atom in the residue.
Use the slider to define the maximum allowed distance between the contact sites, ranging from **4Å to 20Å**:
* **4-6Å:** Tight interaction (hydrogen bonds, salt bridges)
* **8-12Å:** General proximity (nearby residues)
* **15-20Å:** Loose guidance (same binding region)
Toggle **"Enforce with potential"** to make the distance constraint stronger. This leverages the Boltz-steering technique to enforce the distance constraint.
Click **Add Contact Constraint** to save.
 **Common Use Cases:**
* Molecular glues or bridging molecules requiring proximity between biomolecular chains
* Enforcing a known H-bond or salt bridge interaction
* Directing a binder toward a specific protein region without forcing exact geometry
***
## Pocket Constraints
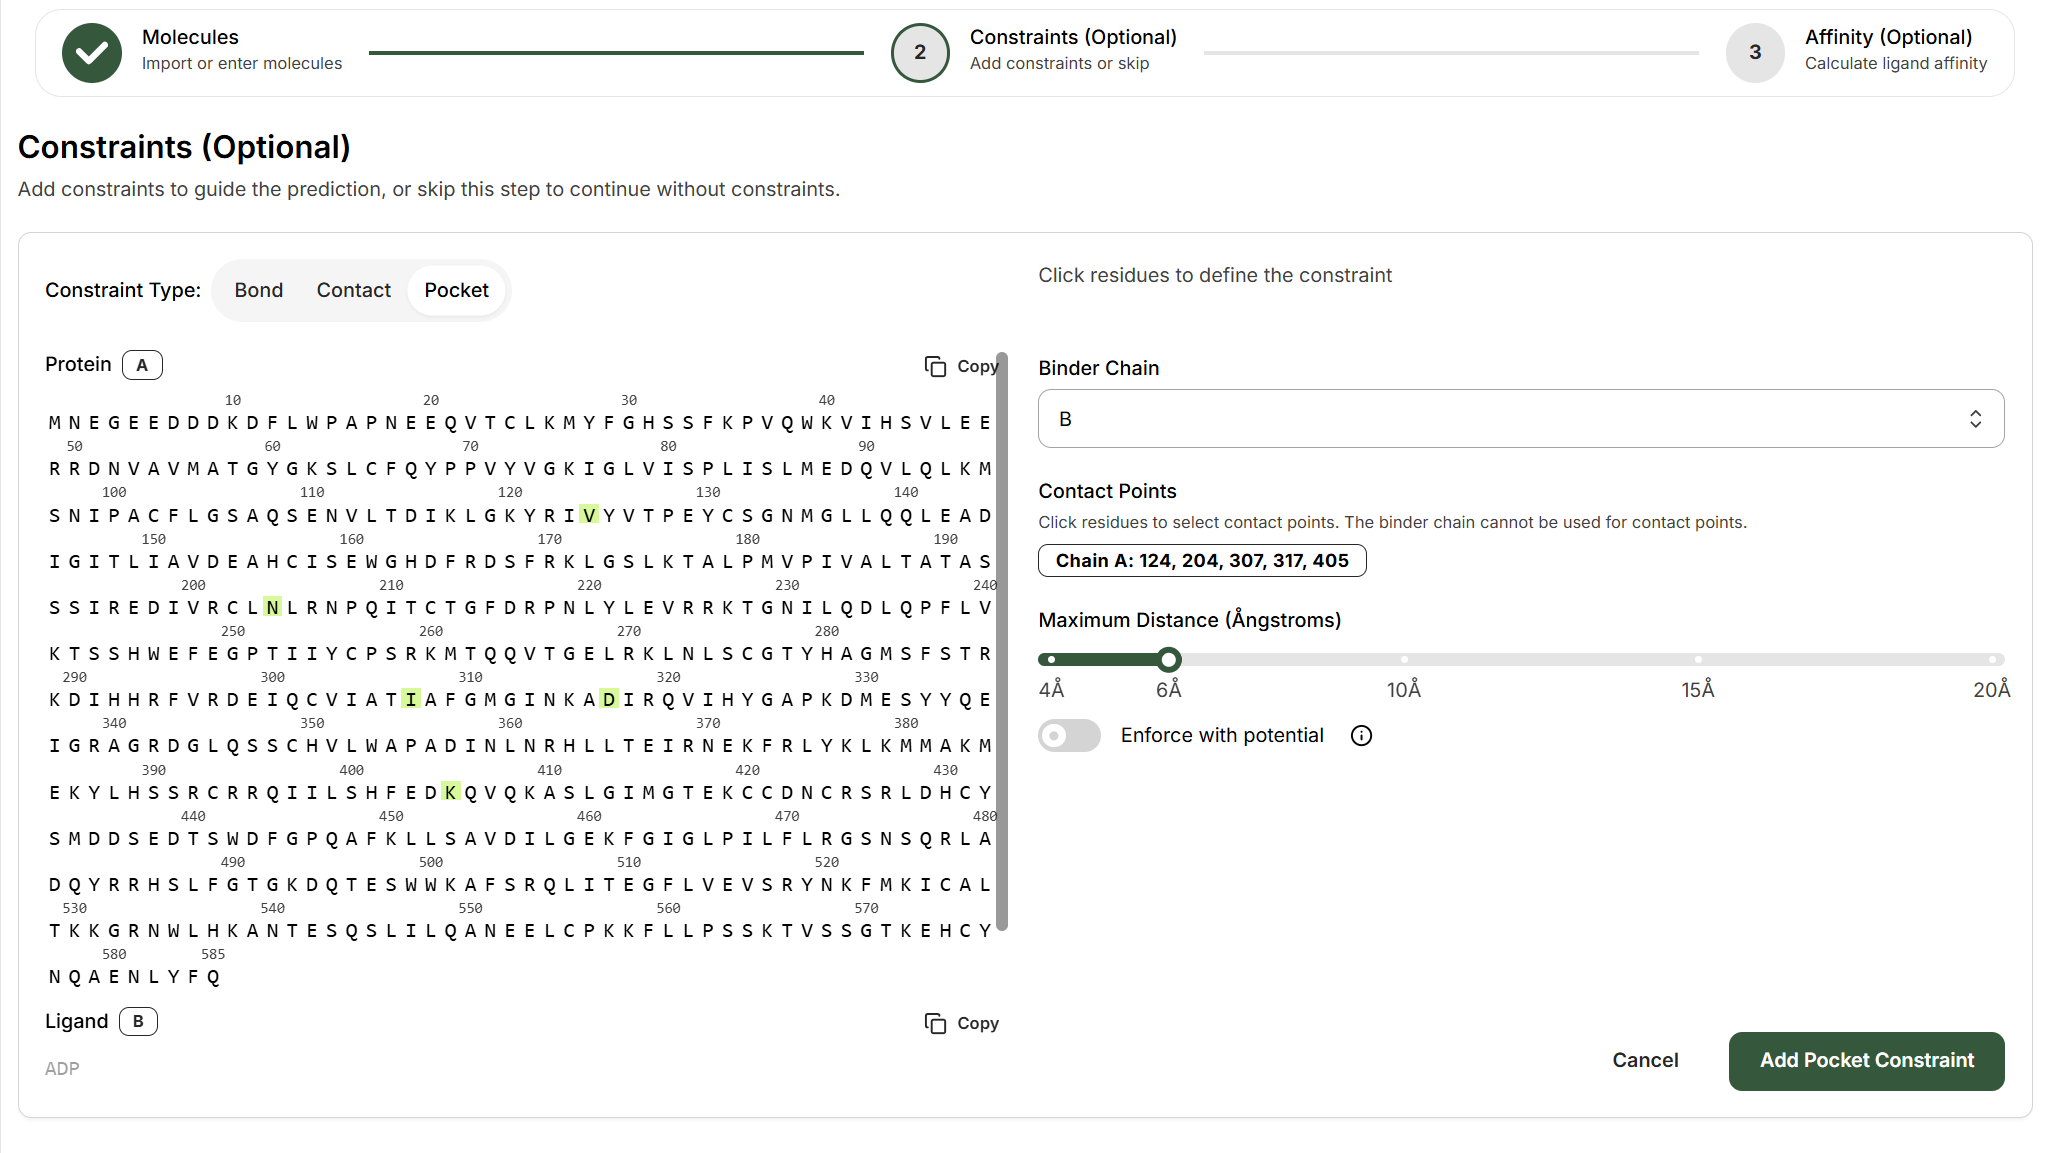
Pocket constraints direct a binder to a specific region of the target protein by defining which residues form the binding site. This can be used for example to specify ligands binding to cryptic pockets, or allosteric sites, or specifying the epitope that an antibody should bind to on the antigen.
### How to Set Up a Pocket Constraint
From the **Binder Chain** dropdown, choose which entity should bind to the defined pocket (e.g., Chain B).
The binder chain itself cannot be used to define contact points. You're defining where the binder should go.
Click on residues in the protein sequence viewer to select the residues that form your target binding site. Selected residues will be highlighted in green.
The interface displays: **Chain A: 124, 204, 307, 317, 405** (example residues)
Use the slider to define how close the binder must be to the pocket residues (4-20Å). This sets the "binding site radius."
Toggle **"Enforce with potential"** to strengthen the pocket constraint. The model force itself to place the binder near the specified residues within the specified distance.
Click **Add Pocket Constraint** to save.
**Common Use Cases:**
* Molecular glues or bridging molecules requiring proximity between biomolecular chains
* Enforcing a known H-bond or salt bridge interaction
* Directing a binder toward a specific protein region without forcing exact geometry
***
## Pocket Constraints
Pocket constraints direct a binder to a specific region of the target protein by defining which residues form the binding site. This can be used for example to specify ligands binding to cryptic pockets, or allosteric sites, or specifying the epitope that an antibody should bind to on the antigen.
### How to Set Up a Pocket Constraint
From the **Binder Chain** dropdown, choose which entity should bind to the defined pocket (e.g., Chain B).
The binder chain itself cannot be used to define contact points. You're defining where the binder should go.
Click on residues in the protein sequence viewer to select the residues that form your target binding site. Selected residues will be highlighted in green.
The interface displays: **Chain A: 124, 204, 307, 317, 405** (example residues)
Use the slider to define how close the binder must be to the pocket residues (4-20Å). This sets the "binding site radius."
Toggle **"Enforce with potential"** to strengthen the pocket constraint. The model force itself to place the binder near the specified residues within the specified distance.
Click **Add Pocket Constraint** to save.
 **When to Use Pocket Constraints:**
* Targeting an allosteric site distinct from the orthosteric pocket
* Modeling binders to a cryptic pocket that's not obvious in the apo structure
* Disambiguating between multiple potential binding sites on the same protein
* Enforcing binding to a specific sub-pocket in a large binding cavity
***
## Tips for Effective Constraints
Add one constraint at a time and validate results before adding more. Over-constraining can force unrealistic structures.
Base constraints on SAR data, crystal structures, or biochemical assays.
Run a prediction without constraints as a baseline. If it fails to find the correct binding mode, then add constraints.
Check pLDDT and iPTM scores after adding constraints. Lower scores may indicate incompatible constraints.
***
## What's Next?
Walk through a real covalent warhead prediction
Model ternary complexes with contact constraints
Target allosteric or cryptic binding pockets
**When to Use Pocket Constraints:**
* Targeting an allosteric site distinct from the orthosteric pocket
* Modeling binders to a cryptic pocket that's not obvious in the apo structure
* Disambiguating between multiple potential binding sites on the same protein
* Enforcing binding to a specific sub-pocket in a large binding cavity
***
## Tips for Effective Constraints
Add one constraint at a time and validate results before adding more. Over-constraining can force unrealistic structures.
Base constraints on SAR data, crystal structures, or biochemical assays.
Run a prediction without constraints as a baseline. If it fails to find the correct binding mode, then add constraints.
Check pLDDT and iPTM scores after adding constraints. Lower scores may indicate incompatible constraints.
***
## What's Next?
Walk through a real covalent warhead prediction
Model ternary complexes with contact constraints
Target allosteric or cryptic binding pockets